Thursday, August 11, 2022

Sewing Room Construction - Doors!

The main purpose of separating out my sewing room was to have doors I could close - doors to keep people out, doors to keep the mess in, and doors for some small sense of privacy despite the glass panels. To keep with the aesthetic of my house, I ordered two 24" doors, craftsman style. All the window panes were tempered glass, and I was VERY pleasantly surprised at the cost: we live in the midwest and it was less than $500 for the set. 

And again, renovating through the holidays actually turned out to be a boon for my timeline: my supplier was able to build the doors in just under three weeks! They arrived right before Thanksgiving, and spent the holiday tucked away from my nephews inside the sewing room. The following Monday my contractor installed them, and by the end of the day they were framed. Here they are freshly installed, without any hardware:

Hardware was a ball-and-catch mechanism to keep them closed (it doesn't lock, but I can live with that), and stationary knobs that don't turn, but help push/pull the door open when the user passes through. 


It was almost sad to see them stained to match the rest of the house, but I have to admit that with hardware and baseboards, they looked pretty good!

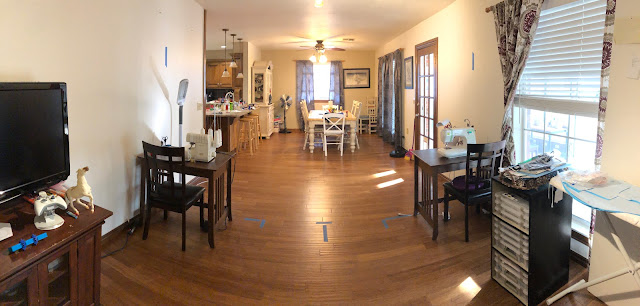
Doors and paint were the final touch, so here's the end product of our sewing room renovation. Here's a panoramic view from the door:

And here's a view from the of the renovation itself.

Now, to put all that stuff back!

Tuesday, August 9, 2022

Sewing Room Construction - A Thanksgiving Adventure

In November 2021, contractors were hard at work adding the wall that would eventually separate my sewing room from the dining area. We'd lucked out, and the electrician (typically the long pole in the tent) came and went the weekend before Thanksgiving. We had lighting:


new outlets, and a dimmer switch: 

But the inner walls were still bare, leaving plenty of exposed electrical. 

This wasn't anticipated to be a big deal: We'd just move Thanksgiving to my MIL's apartment. We have other family in the area, but typically they visit *their* in-laws on T-day, leaving our Thanksgiving to be a cozy 5-6 person affair. Well, not *this* year.

3PM on Wednesday before Thanksgiving - as I was taking my kids to to local library for some unstructured play time - my husband got a call from his sister. Having just had twins 2 months prior, she confessed that she wasn't feeling up for the long drive to her husband's family with three kids in tow. So, she wanted to see if they could join our family's celebration instead.

Of course she could! We certainly weren't going to turn down an offer to celebrate Thanksgiving with her and her family (did I mention baby twins???) but... My MIL's apartment was *not* going to accommodate all of us. Soo... back to the drawing board.  

Or more accurately, cue epic panic.

My SIL's son was 3 years old. The sewing room had exposed outlets, and no doors. There was paint, and ladders, and construction supplies and random sewing implements EVERYWHERE in our dining area. Remember, the sewing room is right next to the dining room.

My husband called me, and I rounded up the kids to go home. The first thing we did was send my MIL to the grocery store for an extra ham, but then the next thing we did was tackle the sewing room. 

Fortunately, we had a pet gate that we usually use so we can leave the front door open without letting the cat out: it was JUST wide enough to cover the opening to the sewing room. Phew. 

And then, we had to get everything that was OUTSIDE the sewing room into the sewing room: here's how it looked when we were done:


Thanksgiving that year was lovely - and with the lights off in the sewing room you could barely even see the mess that was in there. But oh boy, was that a memorable holiday, and not just because of the twins!!!

Friday, August 5, 2022

Sewing Room Construction - Framing it all in

In summer of 2021 - 9 years after we moved into our house -  I developed a plan for renovating my sewing area to be an actual, closed-off room inside the house. Given the post-COVID home improvement boom, it took a few months to find an available, qualified contractor. It turns out most (sensible) people *don't* want home renovations interfering with their holiday plans, so my contractor was available starting... two weeks before Thanksgiving. Oooof. But, having waited this long, I was not about to let another delay slow me down: Christmas sewing schedule be darned, I signed on the dotted line and we started the renovation!!!

 
Here's the early stages, where you can see the framing for the wall going on. Then came drywall - one side only, so I could keep kids out of the area under construction, but the electrician could still work.

Here's the lighting I chose for the sewing room: can lighting seems to be the big recommendation for work spaces, but since this sewing room is doubling as a second TV area, I wanted something dimmable. I also suspected I wanted daylight color, but I wasn't sure. These lights - purchased at Home Depot - let me decide after installation, because have a switch that goes into the ceiling and lets you select a different "bulb" color at any time (if you're willing to pull the light back out again). 


Meanwhile, my machines were chilling up in my master bedroom, ready for all that Christmas sewing I  was planning (more on that later).


Wednesday, August 3, 2022

Planning for an Improved Sewing Room!!!

We moved into our current house in 2013, and it took us a year or two to settle on a use for the giant room at the back of the house. One half of it was the Dining Room:


And the other half of it - intended to be a den when the house was built in the 80s - became my sewing area. Slowly, we added an area for my rulers, a design board, a rolling cutting table and a LOT of fabric. We figured it out, and we had a space that (mostly) worked for the purpose. 


But... it was always awkward to have whatever creative mess I had laid out visible from the dining room. Forget sewing to surprise a family member around a birthday or Christmas. Plus as our friends became parents around us, more frequent were the times I had to "hide all the sharp things" (and my machines) so we could host someone. 

We'd talked about separating the rooms for a while, but after a few particularly harrowing fabric-scissors-and-running-toddler incidents, We figured now was the time. I came up with a plan: 


A new wall, some craftsman-style french doors to match the rest of the house, new LED lighting to replace the track lighting that had forever been driving me crazy, and lots of new outlets so I could plug everything in. It took me over 3 months to line the contractor up, but about 2 weeks before Thanksgiving, we were off to the races! Committing so close to the holidays was kind of scary, but after so much time I was not about to push the project back any further.

Monday, August 1, 2022

Chokobo Tee

Wanting to be a good supporter of a well-loved fabric host, I posted a glowing review with this picture to the fabric host's facebook feed... or so I thought.


In actuality, I accidentally posted it to my *own* facebook page, where the people it was supposed to be a surprise for promptly complimented it (d'oh!) and I also found out that one of my Brothers-in-law (to be clear, I have 6) was a heretofore undiscovered Final Fantasy Fan. Whoops!

This led to a mad scramble to figure out which fabric I had not already committed to another project. Fortunately, with two boys to sew for, and a 3-panel set, I did have a panel (and some main... I hope) to spare. 


And thus, the birth of this Tie Dye Diva Zee's Tee, with a Chokobo on front. My nephew is one year old, so I was *just* able to squeeze the back of the shirt out of the bottom of the panel. 


And I'm still addicted to my own modification that adds ringer cuffs to the completed tee. It's about the same amount of work as hemming, and I love the look. 


This shirt was gifted to my nephew in Jan 2022, and although he likes it fine, the most excited recipient was his Dad!