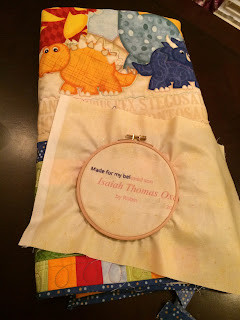
Once Upon a Time, when I put the last stitch in the binding of a quilt, I was done. Finished! On to the next project. Over and out. I am feeling some sweet nostalgia for that time right about now, because I am in the new " 'done' but not done" stage on my son's dinosaur quilt.
I've completed the binding, and if this were a regular quilt - the kind used for tummy time or cuddling on the couch - I would wash it, and that would be that. But this is intended to be a centerpiece to my son's nearly-completed nursery. So, it needs a rod pocket.
If there's one thing the mother of a 2-month old infant *doesn't* have, it's extra time. And this rod pocket has to be stitched on by hand! Sigh. I'm halfway there, but because I'm constantly interrupted (and back at work now) it's slow going.
I'm also tackling a hand-stitched dedication, much as I did for Star Trek and ConVivial Company.
This project-within-a-project is coming with me to doctor's offices and pump sessions, anywhere I think I can get a couple of stitches in. I know I'll be glad for this little piece of legacy in the long run (I have plans to go back and do one for my daughter's quilt too), but summer is giving way to fall here, and I am SO READY to tackle a fall project instead.
And I'm ready to have this hanging in little I's nursery! Once the dedication is stitched, I'll still have to attach it, so it sounds like Christmas Traditions and its fall ilk will have to stay on the backburner a little longer. I may take a quick break to sew a birthday shirt for my daughter, but I hate to let this linger in the to-do pile any longer than I have to.
Oh well. At least I'll have a lot to be proud of when I (finally) finish this. Done, as it turns out, is better than "Done," even if it takes more work to get there!
Tuesday, September 22, 2015
Tuesday, September 15, 2015
Dinosaur Panel Play 2
....Continued from Dinosaur Panel Play 1
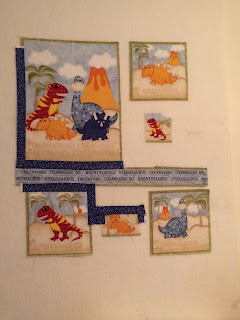
Of all the different layouts I tried for the panel I'm designing around, my initial favorite was the "Three Cornerstone" (or as I thought of it, "gap-toothed sidelight") configuration, seen below.
This layout doe a nice job of highlighting the "center" panel (now in the upper left), and the overall composition is nice. I thought it would be fun to put all the dinosaurs all against a blue background and then "frame out" the dinosaurs in the darker blue from the fabric line, but it is still hard to fill those empty spaces. Both the smallest dinosaurs and the stripe with the scientific names of the species came from the striped fabric in the collection (see DPP1), and they do a good, if slightly repetitive job of it. So, I went to my LQS "for Inspiration" and came back with these:
And for for all my dreading, it didn't look half bad! Now I had a logical place to *put* my rainbows, and the color variety also made it easier to add in a dino names stripe I'd been admiring earlier. When I added those to the top and bottom it looked like this:
I debated extending the "dino names" stripe to all four sides of the quilt, but playing around a bit, it just seemed too uninspired. I liked the idea of incorporating more dinosaur images - but needed them to pop a little more when I set them against the rainbow. So, my mother came up with this idea:
In short, I "bound" each of the small dinosaur pictures in a "contrasting" color (the same fabric as the sashing), and now I can use a straight stitch to attach them to the quilt in the quilting stage. It's still a form of applique, but I get a border I like, and I don't have to worry about raw edges. Here's a "dry run" of the final quilt top, with the dinosaur pictorials just pinned on.
Not bad for an improv design!
Linking up to Freemotion by the River's Linky Tuesday and Blossom Heart Quilt's Sew Cute Tuesday because, why not?
Monday, September 14, 2015
Dinosaur Panel Play 1
To review, I am trying to turn this panel:
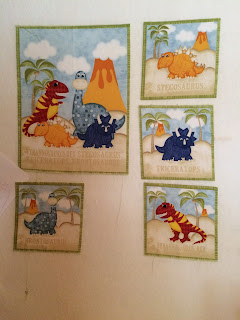
Into a quilt for my now 7-week-old son, using my own ability to design on the fly and tips found in the book Panel Play by Barbara Becker (see my full mission statement here, written while I was still pregnant). To start out, I cut the panel apart and played with the overall layout of the feature fabric. First off, I tried a central panel, and four cornerstones:
This layout does put the most interesting element in the center, but it just *feels* aproportional to me. It also makes for a larger quilt than I'd intended (45 x 60 rather than 36 x 45 or so), and so I went ahead and tried some other things.
A "sidelights" look does emphasize the four-dinosaur panel more, And it *feels* more proportional than the first one (yay rule of 2/3!). But, I'm not into blocks in just one place, so the space between the brontosauras and the tyrannosaurus would need its own strong "pictorial" design element - and I didn't want to spend too long on complicated piecing or applique.
Removing another "side singleton" does give me more room to work with. But since the two spaces had different aspect ratios, I can't just do the same thing twice. I did spend some time brainstorming on this configuration, though, and added in some other fabrics.
To Be Continued In Dinosaur Panel Play 2...
Into a quilt for my now 7-week-old son, using my own ability to design on the fly and tips found in the book Panel Play by Barbara Becker (see my full mission statement here, written while I was still pregnant). To start out, I cut the panel apart and played with the overall layout of the feature fabric. First off, I tried a central panel, and four cornerstones:
This layout does put the most interesting element in the center, but it just *feels* aproportional to me. It also makes for a larger quilt than I'd intended (45 x 60 rather than 36 x 45 or so), and so I went ahead and tried some other things.
A "sidelights" look does emphasize the four-dinosaur panel more, And it *feels* more proportional than the first one (yay rule of 2/3!). But, I'm not into blocks in just one place, so the space between the brontosauras and the tyrannosaurus would need its own strong "pictorial" design element - and I didn't want to spend too long on complicated piecing or applique.
To Be Continued In Dinosaur Panel Play 2...
Subscribe to:
Comments (Atom)


